Documents

Wake Logger Documents

Find step-by-step guides for account setup, vessel records, trip uploads, reports, sharing, support, billing, and premium workflows.

Search the guides available to you, then use categories to narrow the list by workflow.

Getting Started

Use the Documents Page

Search, filter, and open direct links to Wake Logger guides.

Search documents:

  1. Open `/documents`.
  2. Type a term into the search box.
  3. Review matching guide titles, categories, and snippets.
  4. Select a search result to jump to that guide.
  5. Clear the search box to return to the full category view.

Browse by category:

  1. Use the category buttons on the left side of the documents page.
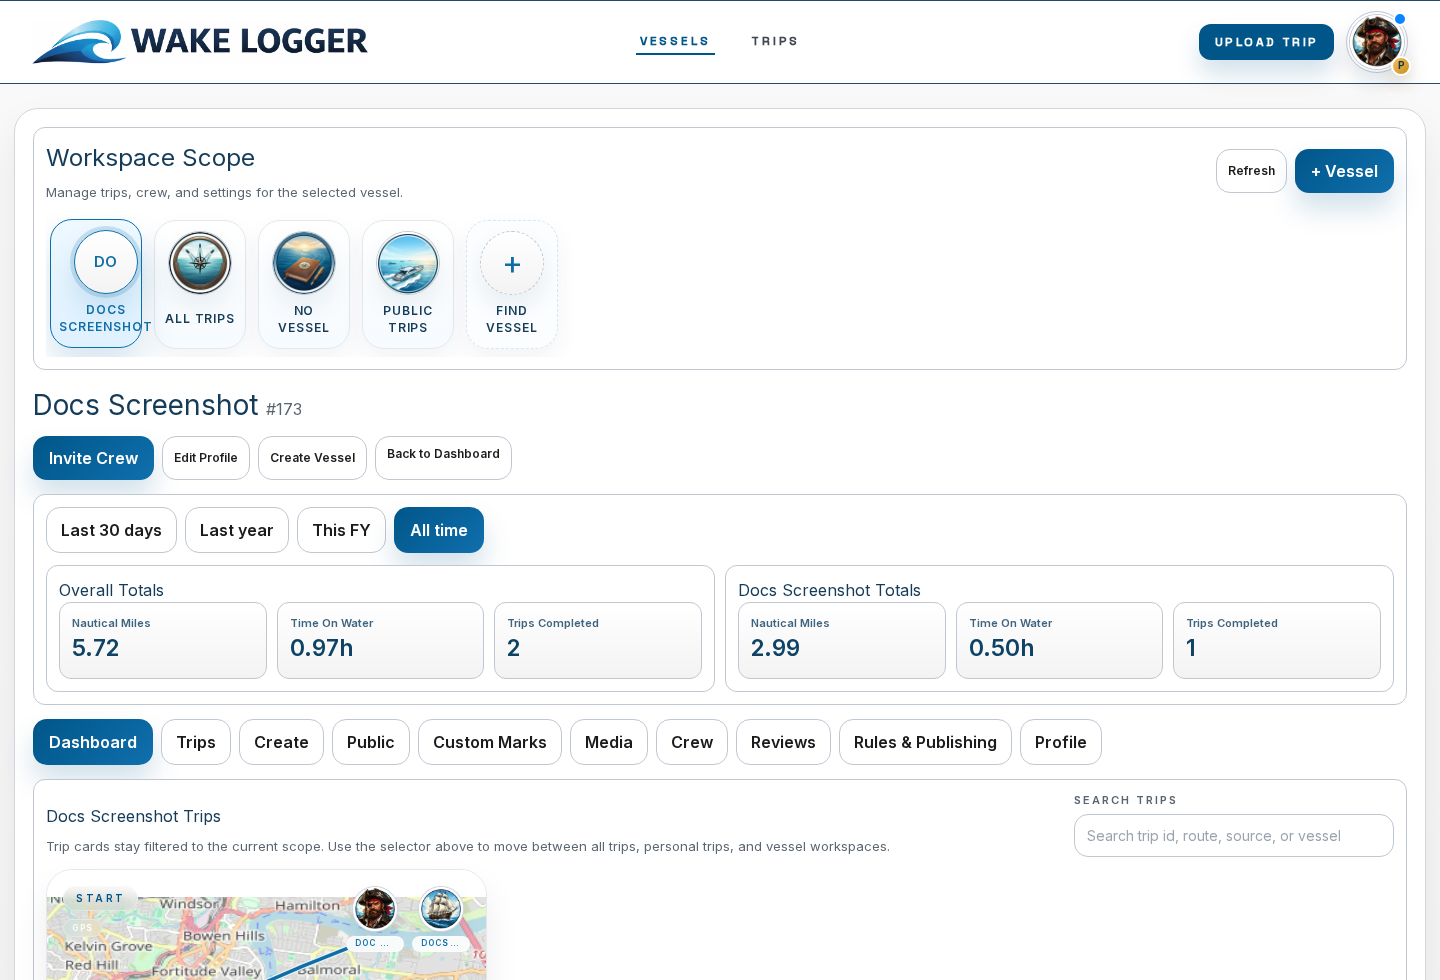
  2. Select `All Documents` to show every guide available to your account.
  3. Select a specific category such as `Trips & Uploads`, `Account`, `Support`, or `Premium` to narrow the page.
  4. If a category has no visible guides for your access level, the page tells you no documents are available there.

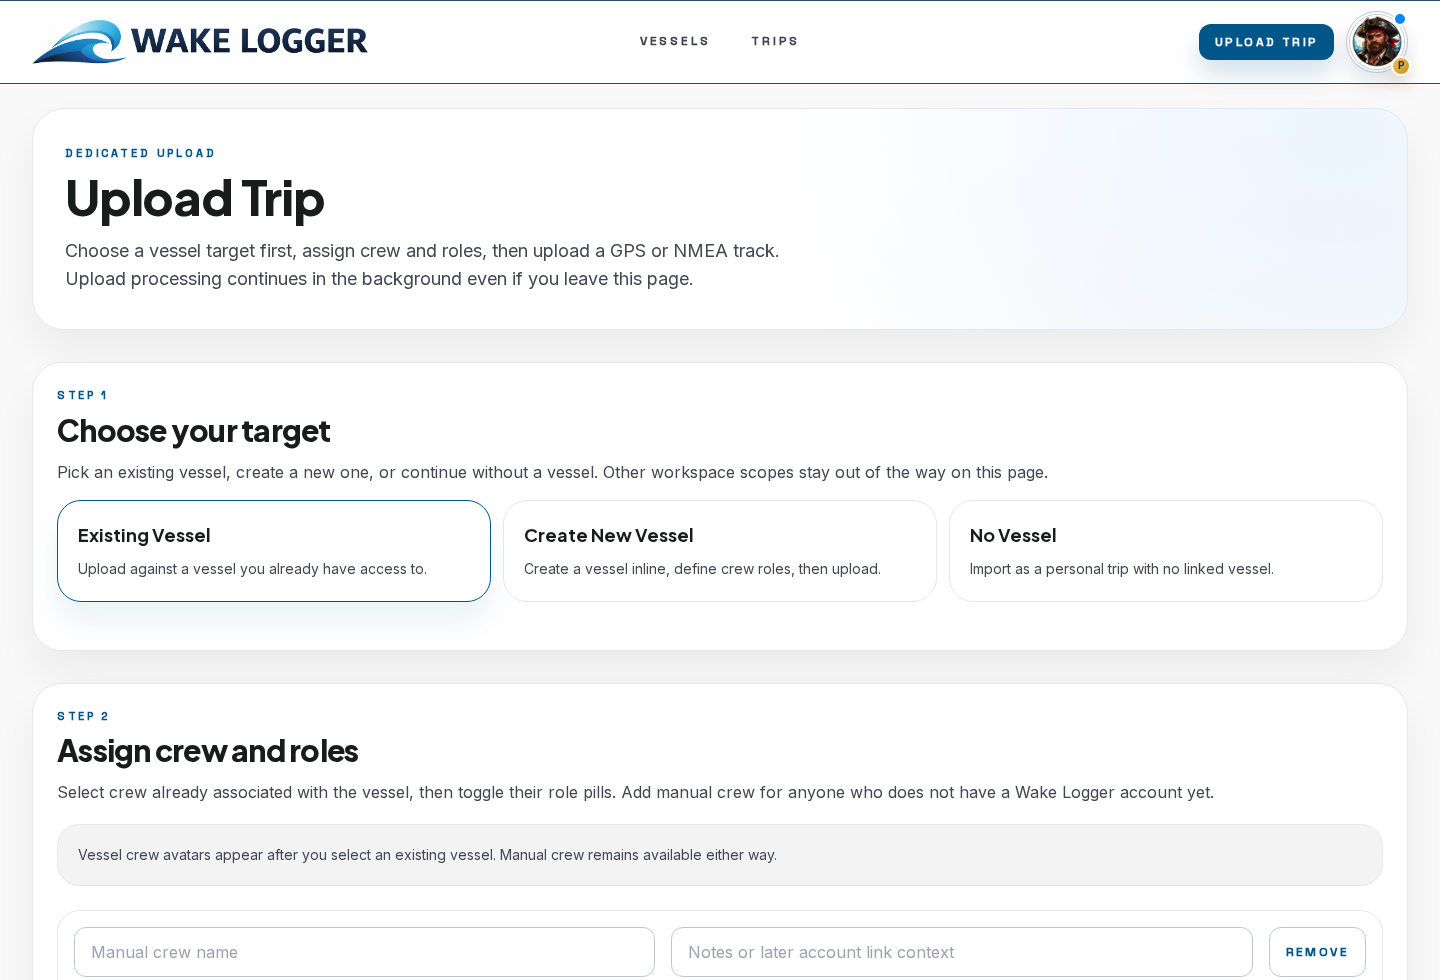
Open direct guide links:

  1. Use `/documents/{slug}` when someone sends a direct guide link.
  2. If you can access the guide, the page scrolls to it.
  3. If the guide is premium and your account does not have the required feature, the page shows the locked guide card instead.
  4. If the slug does not exist, browse the available guides from the documents page.
Reviewed 2026-04-28
Getting Started

Start with Wake Logger

Create an account, sign in, confirm your timezone, and understand the first workspace view.

Create your account:

  1. Open `Register` from the public site header.
  2. Enter your display name, email address, password, and timezone.
  3. Submit the form.
  4. When registration completes, continue into the signed-in workspace.
  5. If you already have an account, use `Sign In` instead of registering again.

Check the first workspace view:

  1. Confirm the profile menu shows your signed-in account.
  2. Review the workspace options for creating a vessel, joining or finding a vessel, uploading a trip, or continuing with personal trips.
  3. Open the profile menu and note the account-level pages: `Account`, `Activity`, `Billing`, `Documents`, and `Workspace`.
  4. Before uploading a trip, go to `Account` and confirm your timezone is correct.
  5. Return to the workspace when the account details are correct.
Reviewed 2026-04-28
Getting Started

Wake Logger Page Directory

Use this directory to understand what each Wake Logger page is for and where to go next.

Core public pages:

  1. `/` is the public home page for signed-out visitors and the workspace entry point for signed-in users.
  2. `/features` navigation anchors on the home page explain the product areas.
  3. `/public/trips` lists recent public trips.
  4. `/documents` opens the searchable documentation.
  5. `/contact` is the signed-in contact request page.
  6. `/terms`, `/privacy`, and `/refunds` explain service, privacy, cancellation, and refund policies.

Account access pages:

  1. `/register` creates a user account.
  2. `/login` signs in an existing user.
  3. `/email-change/{token}` confirms a requested email change.
  4. `/invite/{token}` accepts an account or vessel invite.
  5. `/owner-setup/{token}` completes owner vessel setup from an owner-claim link.

Signed-in user pages:

  1. `/account` manages avatar, profile settings, email, password, and account invites.
  2. `/activity` shows notifications, upload timelines, and crew review requests.
  3. `/billing` manages premium subscriptions and billing self-service.
  4. `/support` creates and tracks support requests.
  5. `/upload-trip` uploads trip files and assigns crew.
  6. `/vessels/manage` is the main signed-in workspace for scopes, vessels, crew, trips, reviews, custom marks, and vessel analytics.

Trip, reporting, and premium pages:

  1. `/reports/{voyageId}` shows the trip report and PDF exports.
  2. `/race-analytics/{voyageId}` opens AI Sailing Captain for eligible trips.
  3. `/formal-logging` manages qualification goals and evidence.
  4. `/qualifications` lists qualification guides.
  5. `/qualifications/{frameworkCode}/{code}` shows a qualification detail page.

Public profile and trip pages:

  1. `/u/{slug}` shows a public user profile.
  2. `/u/{slug}/trips/{tripSlug}` shows a public trip owned by a public user profile.
  3. `/v/{slug}` shows a public vessel profile.
  4. `/v/{slug}/trips/{tripSlug}` shows a public trip connected to a public vessel profile.
  5. `/public/trips/{voyageId}` shows a read-only public trip by voyage id.
Reviewed 2026-04-28
Getting Started

Home, Register, and Sign In Pages

Use the public home page, create an account, sign in, and recover the intended next page after authentication.

Use the home page:

  1. Open `/`.
  2. If you are signed out, review the public Wake Logger overview and navigation.
  3. Use `Sign In` if you already have an account.
  4. Use `Create Account` or `Register` if you are new.
  5. Use public trip and document links to inspect the app before signing in.

Create an account from `/register`:

  1. Open `/register`.
  2. Enter your email address.
  3. Enter your display name.
  4. Enter a password that meets the page requirements.
  5. Choose timezone, unit system, home region, and onboarding intents when those fields are shown.
  6. Submit the form.
  7. Continue to the workspace or the `next` page if you were sent to registration from another workflow.

Sign in from `/login`:

  1. Open `/login`.
  2. Enter your account email.
  3. Enter your password.
  4. Submit the sign-in form.
  5. If the page URL includes `next`, Wake Logger returns you to that destination after sign-in.
  6. If you do not have an account, use the register link shown on the sign-in page.
Reviewed 2026-04-28
Vessels & Crew

Create and Manage Vessels

Create vessel profiles, choose vessel scope, maintain ownership details, and control shared access.

Create a vessel:

  1. Sign in and open the workspace.
  2. Choose the vessel area or `Create New Vessel` action.
  3. Enter the vessel name first.
  4. Add the profile details you know, such as make, model, measurements, propulsion type, owner details, registration number, and call sign.
  5. If the vessel should have a public page, set the public slug and enable the public vessel profile.
  6. Save the vessel.
  7. Select the vessel in the workspace before creating or uploading trips that belong to it.

Work in the correct scope:

  1. Use personal scope for trips that should belong only to your account.
  2. Use vessel scope when a trip should inherit vessel identity, crew roles, vessel sharing, and vessel access.
  3. Confirm the selected scope before uploading a trip or changing crew settings.

Manage crew access:

  1. Open the vessel management area for the selected vessel.
  2. Review current crew or access members.
  3. Create or adjust vessel roles where needed.
  4. Invite users or respond to access requests.
  5. Recheck the vessel before publishing or reporting trips that depend on crew assignments.
Reviewed 2026-04-28
Vessels & Crew

Invite and Owner Setup Pages

Accept account invites, vessel access invites, and owner vessel setup links.

Accept an invite from `/invite/{token}`:

  1. Open the invite link exactly as received.
  2. Review the invite details.
  3. If you are asked to sign in or create an account, complete that step first.
  4. Accept the invite.
  5. Continue to the workspace.
  6. If the invite is expired, revoked, or already used, ask the sender to resend or create a new invite.

Complete owner setup from `/owner-setup/{token}`:

  1. Open the owner setup link.
  2. Review the vessel setup or owner claim details.
  3. Sign in or create an account if prompted.
  4. Confirm the owner setup information.
  5. Submit the setup form.
  6. Open the workspace and check that the vessel appears under your access.

Use invite links safely:

  1. Treat invite links as account access links.
  2. Do not forward them unless the sender intended that.
  3. If a link does not work, use Support or ask the owner/admin to revoke and recreate it.
Reviewed 2026-04-28
Trips & Uploads

Upload Trips

Upload GPX, NMEA, DAT-family, CSV, KML, or GeoJSON trip files and follow the persisted progress timeline.

Upload a trip file:

  1. Sign in.
  2. Select the correct workspace scope: personal or the vessel that owns the trip.
  3. Open `Upload Trip`.
  4. Choose the trip file from your device. Supported import families include GPX, NMEA, DAT-family files, CSV, KML, and GeoJSON.
  5. Check any visible vessel or trip options before submitting.
  6. Select the upload button.
  7. Watch the progress panel that appears below the upload button.

Read the progress timeline:

  1. Wait until the file storage step completes.
  2. When the page says it is safe to leave, you may navigate away while background processing continues.
  3. Review each timestamped step in order.
  4. For GPX files, expect GPS parsing, point normalization, and enrichment-oriented steps.
  5. For NMEA or DAT files, expect identification and decode steps when Wake Logger can report them.
  6. If weather or tide enrichment fails but the import succeeds, treat the trip as imported and review the failed enrichment step separately.
  7. Open `Activity` later if you need to review the same upload timeline again.
Reviewed 2026-04-28
Trips & Uploads

Trip Upload CSV Specification

Prepare a CSV GPS track file that Wake Logger can import as a trip track.

Use this CSV format for trip uploads:

  1. Save the file with a `.csv` extension.
  2. Use UTF-8 text.
  3. Use a comma-separated header row.
  4. Keep one track point per row.
  5. Keep the uploaded file under 20 MB.
  6. Upload it from `Upload Trip` after selecting the correct personal or vessel scope.

Required location columns:

  1. Include one latitude column named `lat` or `latitude`.
  2. Include one longitude column named `lon`, `lng`, `long`, or `longitude`.
  3. Use decimal degrees.
  4. Use negative latitude for south and negative longitude for west.
  5. Rows without both latitude and longitude are ignored as track points.

Optional time columns:

  1. Add one timestamp column named `time`, `timestamp`, `datetime`, or `date_time`.
  2. Use ISO 8601 values such as `2026-02-28T04:10:00Z`.
  3. Include a timezone offset or `Z` when possible.
  4. If the timestamp has no timezone, Wake Logger treats it as UTC.
  5. If no valid timestamps are present, Wake Logger can still import the route geometry but cannot derive a precise trip time window from the CSV.

Optional motion columns:

  1. Add `speed` or `sog` for speed over ground in knots.
  2. Add `heading`, `course`, or `cog` for heading/course in degrees.
  3. Leave values blank when unknown.
  4. Wake Logger normalizes and filters track points after parsing.

Example CSV:

timestamp,latitude,longitude,speed,heading 2026-02-28T04:10:00Z,-27.4705,153.0260,12.1,45 2026-02-28T04:20:00Z,-27.4600,153.0500,13.2,50

Reviewed 2026-04-28
Trips & Uploads

GPS File Specifications

Understand the GPX, KML, GeoJSON, CSV, DAT, and ZIP formats Wake Logger accepts for trip uploads.

Supported trip upload extensions:

  1. `.gpx` for GPX track files.
  2. `.kml` for KML coordinate paths.
  3. `.geojson` for GeoJSON Point, MultiPoint, LineString, or MultiLineString geometry.
  4. `.csv` for Wake Logger's GPS CSV format.
  5. `.dat` for supported Yacht Devices/NMEA 2000 data logs.
  6. `.zip` for archives containing one or more `.DAT` files.
  7. Each upload must be under 20 MB.

GPX support:

  1. Wake Logger reads `trkpt` elements.
  2. Each `trkpt` must provide `lat` and `lon` attributes to become a track point.
  3. `time` child elements are parsed as point timestamps.
  4. `speed` child elements are parsed as speed values when present.
  5. `course` child elements are parsed as heading/course values when present.
  6. Waypoints and route points are not used as the primary trip track.

KML support:

  1. Wake Logger reads `coordinates` elements.
  2. Coordinates must be in KML order: longitude,latitude,altitude.
  3. Altitude is accepted in the coordinate tuple but is not used for trip metrics.
  4. KML imports do not currently derive point timestamps from the KML document.
  5. Use GPX or CSV when point timing is important.

GeoJSON support:

  1. Wake Logger accepts a FeatureCollection, a single Feature, or a raw geometry object.
  2. Supported geometry types are Point, MultiPoint, LineString, and MultiLineString.
  3. Coordinates must be in GeoJSON order: longitude,latitude.
  4. A feature-level `time`, `timestamp`, or `datetime` property is used when present.
  5. Per-coordinate timestamps inside coordinate arrays are not currently parsed.

MIME types accepted by the upload endpoint include common XML, JSON, CSV, ZIP, text/plain, and application/octet-stream variants, but the file extension controls which parser is used.

Reviewed 2026-04-28
Trips & Uploads

NMEA 2000 DAT and ZIP Specifications

Know which NMEA-style files and PGNs Wake Logger can decode from DAT-family uploads.

Use this format for NMEA imports:

  1. Upload a `.dat` file when you have a single supported data log.
  2. Upload a `.zip` file when you have multiple `.DAT` files from the same trip.
  3. In ZIP uploads, Wake Logger reads files ending in `.dat`, ignores macOS metadata entries, sorts the DAT filenames naturally, and joins decoded points.
  4. Keep the upload under 20 MB.
  5. Use GPX or CSV if your data is NMEA 0183 text sentences; the current DAT parser is for DAT-family NMEA 2000/Yacht Devices logs, not generic `.nmea` or `.txt` sentence streams.

Decoder modes:

  1. The default decoder is Wake Logger's Python YDVR decoder.
  2. Operators can configure `GPS_DAT_DECODER_MODE=canboat` to use the Canboat `ydr-file` command instead.
  3. The decoder timeout is controlled by `GPS_DAT_DECODER_TIMEOUT_SECONDS`.
  4. If a DAT file cannot yield at least two track points, Wake Logger treats the decode as failed.

NMEA 2000 PGNs used for trip tracks and sailing metrics:

  1. `129025` Rapid Position Update: latitude and longitude.
  2. `129029` GNSS Position Data: latitude, longitude, date/time, and GNSS metadata.
  3. `129026` COG & SOG Rapid Update: speed over ground and course over ground.
  4. `127250` Vessel Heading: heading.
  5. `128267` Water Depth: depth.
  6. `126992` System Time: time anchor.
  7. `129033` Time & Date: date/time anchor.
  8. `130306` Wind Data: apparent wind speed and apparent wind angle when the reference is apparent.

How Wake Logger builds the track:

  1. It collects position points from PGN `129025` and `129029`.
  2. It uses time/date PGNs and GNSS timestamps to anchor relative log time to real UTC time.
  3. It merges rapid and GNSS position streams when both are present.
  4. It attaches nearby COG, SOG, heading, depth, apparent wind speed, and apparent wind angle to track points.
  5. It derives true wind speed and direction when apparent wind, SOG, and COG are available close enough to the point.
  6. It records decode details such as decoded message count, decoded frame count, dropped records, corrupt records, truncated records, joined file count, and gap segments.
Reviewed 2026-04-28
Sharing

Share Trips and Public Profiles

Publish user profiles, vessel profiles, and selected trips without exposing private workspace records.

Publish a user profile:

  1. Open `Account`.
  2. Fill in the public profile details you want visible.
  3. Enable the public user profile setting.
  4. Save account settings.
  5. Select `View Public Profile` and review the page before sharing it.

Publish a vessel profile:

  1. Open the vessel management area.
  2. Select the vessel.
  3. Add the public summary and public slug.
  4. Enable the public vessel profile.
  5. Save the vessel profile.
  6. Open the public vessel page and review it before sending the link.

Publish a trip:

  1. Open the trip in the signed-in workspace.
  2. Confirm the vessel, route, dates, crew, photos, and public-safe details.
  3. Enable or update the trip publication controls.
  4. Open the public trip link.
  5. Review the public page from the viewer's perspective.
  6. Unpublish or edit the trip if the public page exposes details you do not want shared.
Reviewed 2026-04-28
Sharing

Public Profiles and Public Trip Pages

Understand public user profiles, vessel profiles, public trip listings, and read-only public trip pages.

Use the public trips index:

  1. Open `/public/trips`.
  2. Browse recent published trips.
  3. Select a trip card to open the read-only public trip view.
  4. Use public pages for sharing, not for editing.

Use a public user profile:

  1. Open `/u/{slug}` from a shared profile link.
  2. Review the user's public display name and visible profile details.
  3. Open public trips listed on that profile when available.
  4. If you own the profile, edit public profile settings from `Account`, not from the public page.

Use a public vessel profile:

  1. Open `/v/{slug}` from a shared vessel link.
  2. Review the vessel summary and visible vessel details.
  3. Open public trips listed on the vessel page when available.
  4. If you manage the vessel, edit public profile settings from the vessel workspace, not from the public page.

Use public trip detail pages:

  1. Open `/public/trips/{voyageId}`, `/u/{slug}/trips/{tripSlug}`, or `/v/{slug}/trips/{tripSlug}`.
  2. Review the route map, trip summary, approved media, and public-safe conditions.
  3. Treat the page as read-only.
  4. If something should not be public, sign in and update or unpublish the trip from the workspace.
Reviewed 2026-04-28
Support

Contact and Policy Pages

Use contact, terms, privacy, and refund pages for account, data, legal, and billing policy questions.

Use `/contact`:

  1. Sign in before opening `/contact`.
  2. If the page says sign-in is required, use the sign-in or register action.
  3. Enter the contact subject.
  4. Write the request with enough detail for the admin team.
  5. Add attachments if the form offers them and they are relevant.
  6. Submit the request.
  7. Track replies through support, email, or account activity depending on the workflow.

Use `/terms`:

  1. Open `/terms` to review account eligibility, vessel access, user content, public sharing, paid features, cancellation, prohibited conduct, and liability terms.
  2. Read the Terms before relying on Wake Logger for operational or public sharing workflows.
  3. Use Support or Contact for questions about how the terms apply to your account.

Use `/privacy`:

  1. Open `/privacy` to review what information Wake Logger collects.
  2. Review public sharing visibility before publishing profiles or trips.
  3. Review payment, retention, deletion, and communication sections when managing account data.
  4. Use Support or Contact for access, deletion, or billing privacy questions.

Use `/refunds`:

  1. Open `/refunds` to review cancellation, trials, refunds, and billing error handling.
  2. For billing errors, contact support promptly with account details and the approximate billing date.
  3. Read refunds together with Terms and Privacy.
Reviewed 2026-04-28
Premium

Qualification Guide Pages

Use `/qualifications` and qualification detail pages to understand targets before tracking goals.

Use `/qualifications`:

  1. Open `/qualifications`.
  2. Browse qualification guide cards.
  3. Select a target to open its detail page.
  4. Use `Formal Logging` when you are ready to track goals or evidence.

Use `/qualifications/{frameworkCode}/{code}`:

  1. Open a qualification detail from the guide list.
  2. Read `Qualification Summary` or `Likely Required`.
  3. Review `What Wake Logger Tracks`.
  4. Review `Requirements`.
  5. Review `Sources Reviewed` for external authority or reference links.
  6. Open related targets if the page lists them.
  7. Return to `Formal Logging` when you want to add the goal to your account.
Reviewed 2026-04-28
PremiumPremium

AI Sailing Captain

Premium users with Race Analytics can run guided race setup and AI Sailing Captain analysis.

Create Account
PremiumPremium

Qualification Tracking

Premium users with Qualification Tracking can connect trip evidence to qualification goals.

Create Account
PremiumPremium

Custom Navigation Marks

Custom navigation marks are available when the account or vessel has the required premium access.

Create Account
PremiumPremium

Custom Navigation Mark CSV Specification

Premium users can import custom navigation marks from a documented CSV format.

Create Account
Wake Logger - GPS Trip Replay, Crew Workspaces, and Voyage Logging